
前言
虽然比赛结果一坨屎,但是不影响我把自己写的部分给opensource
总共包含的部分
- 数据标注,预处理与增强部分。
- 模型转换与推理
- 视觉巡线部分(一坨
第一部分:部署巡线代码
如果只是想看看巡线的效果的话,你需要在车上首先启动底盘节点。
电脑上只有早期早期版本的巡线代码,车上的还没拷贝出来(悲
估计要等两天了。
在一代车与二代车都能运行,但是针对二代车的摄像头参数调整,所以在一代车估计不太行
你需要把以下两部分的代码放在车上同一个目录下,注意,应使用python3。
第一个脚本命名为:new_tinkin.py,第二个命名为line_potral_2.py(第二个无所谓叫啥其实,但是你最后要运行它。)
# -*- coding: utf-8 -*-
import cv2
import numpy as np


class LineFinder:
    def __init__(self):
        self.in_doing_img = None
        self.image = None
        self.image_size = (640, 480)
        self.cut_range = [(0, 240), (640, 480)]
        self.image_path = 'photo/11.jpg'
        self.Flag = "Not start"
        self.capture = cv2.VideoCapture(0)

    def read_image(self):
        self.image = cv2.imread(self.image_path, 0)
        self.Flag = "Now Process"

    def read_cap(self):
        ret, frame = self.capture.read()
        img = cv2.cvtColor(frame, cv2.COLOR_RGB2GRAY)
        # cv2.imshow("show_time", img)
        img = cv2.resize(img, (640, 480))
        return img

    # 预处理裁切,模糊与大津法
    def img_pre_deal(self):
        self.image = cv2.resize(self.image, self.image_size)
        cut_image = self.image[self.cut_range[0][1]:self.cut_range[1][1], self.cut_range[0][0]:self.cut_range[1][0]]
        gauss_img = cv2.GaussianBlur(cut_image, (25, 25), sigmaX=0, sigmaY=0)
        edge_img = cv2.adaptiveThreshold(gauss_img, 255, cv2.ADAPTIVE_THRESH_MEAN_C, cv2.THRESH_BINARY, 81, -7)
        kernel = np.ones((5, 5), dtype=np.uint8)
        edge_img = cv2.erode(edge_img, kernel, 1)
        self.in_doing_img = edge_img
        # cv2.imshow("show_time", edge_img)
        # cv2.waitKey(0)

    def line_find(self, mode="normal"):
        if self.in_doing_img is None:
            return False
        else:
            pass
        left_start = 0
        right_start = 640
        up_start = 80
        down_start = 100  # 提取需要处理的部分图像
        img_part = self.in_doing_img[up_start:down_start, left_start:right_start]  # 将图像转换为布尔类型的数组,表示像素值是否大于等于128
        bool_img = img_part >= 128  # 沿水平方向对布尔数组进行求和,得到每列像素值大于等于128的数量
        finally_list = np.sum(bool_img, axis=0)
        pressed_pix = 3  # 请替换为合适的值
        # 计算中间数值
        mid_num = int((right_start + left_start) / 2)
        i = 320
        while finally_list[i] <= pressed_pix and 1 < i < 639:
            i = i + 1
        right_line = i
        i = 320
        while finally_list[i] <= pressed_pix and 1 < i < 639:
            i = i - 1
        left_line = i  # 查找右边界
        pressed_pix = 10  # 请替换为合适的值
        mid_line = (left_line + right_line) / 2

        # test used
        if mode == "test":
            draw_0 = cv2.rectangle(self.in_doing_img, (left_line, up_start), (right_line, down_start), (255, 0, 0), 2)
            cv2.imshow("test", draw_0)
            cv2.waitKey(0)
        else:
            pass

        if left_line <= 1 and right_line >= 639:
            flag = "end"
        elif left_line <= 1:
            flag = "left"
        elif right_line >= 639:
            flag = "right"
        else:
            flag = "normal"

        return mid_line, flag

    def process(self, mode="cam"):
        """

        :param mode: input : "cam" or "test"
        :return: int : line, flag : "normal", "end", "left", "right"
        """
        flags = "normal"
        if mode == 'cam':
            this_frame = self.read_cap()
            self.image = this_frame
            self.img_pre_deal()
            loc, flags = self.line_find()
            loc = loc / self.image_size[0]
            return loc, flags
        elif mode == "test":
            self.read_image()
            self.img_pre_deal()
            loc, flags = self.line_find("test")
            return 0, 0
if __name__ == "__main__":
    line = LineFinder()
    while True:
        line_mid, flag = line.process("cam")
        # cv2.imshow("img",line.in_doing_img)
        # cv2.waitKey(0)
        print(line_mid)
        print(flag)
#!/usr/bin/env python
# -*- coding: utf-8 -*-
import rospy
from geometry_msgs.msg import Twist
from new_tinkin import LineFinder
import time

class PIDController:
    def __init__(self, Kp, Ki, Kd, setpoint):
        self.Kp = Kp  # 比例系数
        self.Ki = Ki  # 积分系数
        self.Kd = Kd  # 微分系数
        self.setpoint = setpoint  # 设定值

        self.prev_error = 0  # 上一次误差
        self.integral = 0  # 积分值

    def update(self, feedback):
        error = self.setpoint - feedback  # 计算误差

        # 计算积分项
        self.integral += error

        # 计算微分项
        derivative = error - self.prev_error

        # 更新上一次误差
        self.prev_error = error

        # 计算控制量
        control = self.Kp * error + self.Ki * self.integral + self.Kd * derivative

        return control


class line_finder:
    def __init__(self):
        # 设置PID参数
        Kp = 4#7
        Ki = 0
        Kd = 2
        setpoint = 0.5  # 设定值
        # 创建PID控制器实例
        self.pid_controller = PIDController(Kp, Ki, Kd, setpoint)

        # 初始化ROS节点
        rospy.init_node('line_patrol_node', anonymous=True)
        # 创建一个Publisher,用于发布速度命令到机器人底盘
        self.cmd_vel_pub = rospy.Publisher('/cmd_vel', Twist, queue_size=10)
        # 创建一个Twist消息,用于控制机器人的线速度和角速度
        self.cmd_vel = Twist()
        # 设置机器人的线速度和角速度
        self.cmd_vel.linear.x = 0.2# 设置线速度为0.2 m/s
        self.cmd_vel.angular.z = 0  # 设置角速度为0.5 rad/s
        self.turn_times = 2
        self.last_turn = 0
    def line_main(self):
        try:

            # rospy.init_node('line_patrol', anonymous=True)

            line = LineFinder()
            turn_times = 2#I`M STUPID
            start_time = time.time()
            last_turn_end = time.time()
            while True:
                line_mid, flag, if_turn = line.process("cam")
                feedback = line_mid
                control = self.pid_controller.update(feedback)
                output = control
            # 打印输出
                print("output:", output, "Feedback:", feedback)
                # self.cmd_vel.linear.x = 0.3
                self.cmd_vel.angular.z= -output
                self.cmd_vel.linear.x = 0.2 + abs(output*0.05)
                rate_value = 0.144
                #rate_value = -0.05
                # 在大幅度转弯(直角弯)时拒绝y方向的移动
                #if (flag=='left' or flag == 'right') or time.time()-start_time <= 8:
               # 1.6 for origin value``
                if abs(output) <= 1.8 or time.time()-start_time <=1:
                    self.cmd_vel.linear.y =  rate_value * output * 1
                elif turn_times == 2 and time.time()-last_turn_end >= 0.5:
                    #break

                    turn_times -= 1
                    turn_time = time.time()

                    while time.time()- turn_time < 1.4:
                        self.cmd_vel.linear.x = 0.2
                        self.cmd_vel.angular.z= -0
                        self.cmd_vel.linear.y = 0

                        self.cmd_vel_pub.publish(self.cmd_vel)

                    turn_time = time.time()

                    while time.time()- turn_time < 1.5:
                        # 1.6 for origin
                        # might could change this to refuse the undetect of secound sharp turn
                        self.cmd_vel.linear.x = 0

                        if output >= 0:
                            self.cmd_vel.angular.z= -0.8
                        else:
                            self.cmd_vel.angular.z=  0.8
                        self.cmd_vel_pub.publish(self.cmd_vel)

                    last_turn_end = time.time()
               #the secound time turn writtend time
                elif turn_times == 1 and time.time()-last_turn_end >= 0.5:
                    #break

                    turn_times -= 1
                    turn_time = time.time()

                    while time.time()- turn_time < 1.3:
                        self.cmd_vel.linear.x = 0.2
                        self.cmd_vel.angular.z= -0
                        self.cmd_vel.linear.y = 0

                        self.cmd_vel_pub.publish(self.cmd_vel)

                    turn_time = time.time()

                    while time.time()- turn_time < 1.5:
                        # 1.6 for origin
                        # might could change this to refuse the undetect of secound sharp turn
                        self.cmd_vel.linear.x = 0

                        if output >= 0:
                            self.cmd_vel.angular.z= -0.8
                        else:
                            self.cmd_vel.angular.z=  0.8
                        self.cmd_vel_pub.publish(self.cmd_vel)

                    last_turn_end = time.time()


                else:
                    pass
                    self.cmd_vel.linear.x = 0.1
                    '''
                    self.cmd_vel.linear.y =  rate_value * output * 1.2
                    self.cmd_vel.angular.z= -output *8
                    self.cmd_vel.linear.x = 0.2
                '''


                '''
                if (-output) > 0.4:
                    self.cmd_vel.linear.y = -0.10
                elif (-output) < -0.4:
                    self.cmd_vel.linear.y = 0.10
                else:
                    self.cmd_vel.linear.y = 0
                '''

                self.cmd_vel_pub.publish(self.cmd_vel)
                if 0:
               #if (if_turn) and time.time()-self.last_turn >= 5:
                    #break
                    self.last_turn = time.time()
                    if self.turn_times == 0 :
                        break
                    self.turn_times -= 1
                    print("直角")
                    #break
                    start_time = time.time()
                    # TRUN SHARP RIGHT/LEFT

                    while time.time() - start_time <= 1: # turn time
                        self.cmd_vel.linear.x = 0.25
                        if flag == "left":
                            self.cmd_vel.angular.z= -0.1
                        else:
                            self.cmd_vel.angular.z= 0.1

                        self.cmd_vel_pub.publish(self.cmd_vel)
                    start_time = time.time()
                    # TRUN SHARP RIGHT/LEFT

                    while time.time() - start_time <= 0.8: # turn time
                        if flag == "left":

                            self.cmd_vel.angular.z= -1.5
                        else:
                            self.cmd_vel.angular.z= 1.5
                        self.cmd_vel.linear.x = 0
                        self.cmd_vel_pub.publish(self.cmd_vel)
                    # GO FORWARD

                if flag=="end" and time.time()-start_time >= 28:
                    stop_time = time.time()
                    while time.time()- stop_time < 0.2:
                        self.cmd_vel.linear.x = 0.2
                        self.cmd_vel_pub.publish(self.cmd_vel)
                    print("结束")
                    break
        except rospy.ROSInterruptException:
            pass
if __name__ == "__main__":
    line = line_finder()
    line.line_main()
之后运行line_patrol.py就可以了。
注意:
详细的解释在下面部分,这个问题挺多的。
第二部分:模型训练转换与推理
训练
选择你的版本
因为很多神秘的原因,我们不得不使用某一特定版本输出的权重文件才能够在最后一步推理的时候成功,所以这一步至关重要,需要这个仓库的内容。
airockchip/yolov5: YOLOv5 in PyTorch > ONNX > CoreML > TFLite (github.com)
值得注意的是你需要在这个仓库下训练。
关于环境安装的问题就不在此赘述了,这搞不懂后面你也看不懂。
预处理你的数据
pass
训练你的模型
在完成数据的生成之后,我们需要开始训练,请注意,你需要一张足够好的nvidia显卡,否则训练时间可能比你备赛的时间还要长。
首先需要创建一个配置文件,这里我随便命名一个
qwq.yaml
path: C://yolov5/auto_maker # dataset root dir
train: images # train images (relative to 'path') 90% of 847 train imagess
val: val/images # train images (relative to 'path') 10% of 847 train images

names:
  0: bodyarmor_1_5
  1: bodyarmor_2_5
  2: bodyarmor_3_5
  3: bodyarmor_4_5
  4: bodyarmor_5_5
  5: firstaid_1_5
  6: firstaid_2_5
  7: firstaid_3_5
  8: firstaid_4_5
  9: firstaid_5_5
  10: man_1_5
  11: man_2_5
  12: man_3_5
  13: smoke_1_5
  14: smoke_2_5
  15: smoke_3_5
  16: smoke_4_5
  17: smoke_5_5
  18: spontoon_1_5
  19: spontoon_2_5
  20: spontoon_3_5
  21: spontoon_4_5
  22: spontoon_5_5
推荐在这里对数据位置使用绝对路径,这样后期如果换别的网络也很方便继续使用同一份配置文件。其次是图像与labels的相对位置,验证集的位置和目标的种类,这个种类会在生成数据集的时候自动生成。
之后我们就可以开始训练了,以本例为例,我们稍微魔改一下train.py
parser.add_argument('--epochs', type=int, default=300, help='total training epochs') parser.add_argument('--batch-size', type=int, default=-1, help='total batch size for all GPUs, -1 for autobatch')这样可以最大化利用你的显卡,顺便多练几轮狠狠地拟合。
之后在终端输入
python .\train.py --data .\xView.yaml --weight yolov5n.pt --img 640在训练完成后你就可以进入下一步了。
转换模型
导出为ONNX模型
就在训练的原工程下,输入这个,把位置换成你自己的权重文件就可以
python .\export.py --rknpu --weight .\runs\train\exp2\weights\1.pt之后就可以带着你的ONNX模型放到RK3588板子上了
转换为RKNN模型(这一步似乎不需要了)
这一步你需要在一台允许Ubuntu18/20/22的PC上进行,所以如果你没有的话,那你完了(btw其实讯飞车上也能干这事,看你自己了)
仓库地址在这里
推理
首先还是需要在板子上面安装上面的这个库
之后把模型和以下文件放在一起:
import os
import cv2
import sys
import argparse
import time
# add path
realpath = os.path.abspath(__file__)
_sep = os.path.sep
realpath = realpath.split(_sep)
sys.path.append(os.path.join(realpath[0]+_sep, *realpath[1:realpath.index('scripts')+1]))

from py_utils.coco_utils import COCO_test_helper
import numpy as np


OBJ_THRESH = 0.25
NMS_THRESH = 0.45

# The follew two param is for map test
# OBJ_THRESH = 0.001
# NMS_THRESH = 0.65

IMG_SIZE = (640, 640)  # (width, height), such as (1280, 736)


# modefile the things there
CLASSES = ("person", "bicycle", "car","motorbike ","aeroplane ","bus ","train","truck ","boat","traffic light",
           "fire hydrant","stop sign ","parking meter","bench","bird","cat","dog ","horse ","sheep","cow","elephant",
           "bear","zebra ","giraffe","backpack","umbrella","handbag","tie","suitcase","frisbee","skis","snowboard","sports ball","kite",
           "baseball bat","baseball glove","skateboard","surfboard","tennis racket","bottle","wine glass","cup","fork","knife ",
           "spoon","bowl","banana","apple","sandwich","orange","broccoli","carrot","hot dog","pizza ","donut","cake","chair","sofa",
           "pottedplant","bed","diningtable","toilet ","tvmonitor","laptop	","mouse	","remote ","keyboard ","cell phone","microwave ",
           "oven ","toaster","sink","refrigerator ","book","clock","vase","scissors ","teddy bear ","hair drier", "toothbrush ")

coco_id_list = [1, 2, 3, 4, 5, 6, 7, 8, 9, 10, 11, 13, 14, 15, 16, 17, 18, 19, 20, 21, 22, 23, 24, 25, 27, 28, 31, 32, 33, 34,
         35, 36, 37, 38, 39, 40, 41, 42, 43, 44, 46, 47, 48, 49, 50, 51, 52, 53, 54, 55, 56, 57, 58, 59, 60, 61, 62, 63,
         64, 65, 67, 70, 72, 73, 74, 75, 76, 77, 78, 79, 80, 81, 82, 84, 85, 86, 87, 88, 89, 90]


def filter_boxes(boxes, box_confidences, box_class_probs):
    """Filter boxes with object threshold.
    """
    box_confidences = box_confidences.reshape(-1)
    class_max_score = np.max(box_class_probs, axis=-1)
    classes = np.argmax(box_class_probs, axis=-1)

    _class_pos = np.where(class_max_score* box_confidences >= OBJ_THRESH)
    scores = (class_max_score* box_confidences)[_class_pos]

    boxes = boxes[_class_pos]
    classes = classes[_class_pos]

    return boxes, classes, scores

def nms_boxes(boxes, scores):
    """Suppress non-maximal boxes.
    # Returns
        keep: ndarray, index of effective boxes.
    """
    x = boxes[:, 0]
    y = boxes[:, 1]
    w = boxes[:, 2] - boxes[:, 0]
    h = boxes[:, 3] - boxes[:, 1]

    areas = w * h
    order = scores.argsort()[::-1]

    keep = []
    while order.size > 0:
        i = order[0]
        keep.append(i)

        xx1 = np.maximum(x[i], x[order[1:]])
        yy1 = np.maximum(y[i], y[order[1:]])
        xx2 = np.minimum(x[i] + w[i], x[order[1:]] + w[order[1:]])
        yy2 = np.minimum(y[i] + h[i], y[order[1:]] + h[order[1:]])

        w1 = np.maximum(0.0, xx2 - xx1 + 0.00001)
        h1 = np.maximum(0.0, yy2 - yy1 + 0.00001)
        inter = w1 * h1

        ovr = inter / (areas[i] + areas[order[1:]] - inter)
        inds = np.where(ovr <= NMS_THRESH)[0]
        order = order[inds + 1]
    keep = np.array(keep)
    return keep


def box_process(position, anchors):
    grid_h, grid_w = position.shape[2:4]
    col, row = np.meshgrid(np.arange(0, grid_w), np.arange(0, grid_h))
    col = col.reshape(1, 1, grid_h, grid_w)
    row = row.reshape(1, 1, grid_h, grid_w)
    grid = np.concatenate((col, row), axis=1)
    stride = np.array([IMG_SIZE[1]//grid_h, IMG_SIZE[0]//grid_w]).reshape(1,2,1,1)

    col = col.repeat(len(anchors), axis=0)
    row = row.repeat(len(anchors), axis=0)
    anchors = np.array(anchors)
    anchors = anchors.reshape(*anchors.shape, 1, 1)

    box_xy = position[:,:2,:,:]*2 - 0.5
    box_wh = pow(position[:,2:4,:,:]*2, 2) * anchors

    box_xy += grid
    box_xy *= stride
    box = np.concatenate((box_xy, box_wh), axis=1)

    # Convert [c_x, c_y, w, h] to [x1, y1, x2, y2]
    xyxy = np.copy(box)
    xyxy[:, 0, :, :] = box[:, 0, :, :] - box[:, 2, :, :]/ 2  # top left x
    xyxy[:, 1, :, :] = box[:, 1, :, :] - box[:, 3, :, :]/ 2  # top left y
    xyxy[:, 2, :, :] = box[:, 0, :, :] + box[:, 2, :, :]/ 2  # bottom right x
    xyxy[:, 3, :, :] = box[:, 1, :, :] + box[:, 3, :, :]/ 2  # bottom right y

    return xyxy

def post_process(input_data, anchors):
    boxes, scores, classes_conf = [], [], []
    # 1*255*h*w -> 3*85*h*w
    input_data = [_in.reshape([len(anchors[0]),-1]+list(_in.shape[-2:])) for _in in input_data]
    for i in range(len(input_data)):
        boxes.append(box_process(input_data[i][:,:4,:,:], anchors[i]))
        scores.append(input_data[i][:,4:5,:,:])
        classes_conf.append(input_data[i][:,5:,:,:])

    def sp_flatten(_in):
        ch = _in.shape[1]
        _in = _in.transpose(0,2,3,1)
        return _in.reshape(-1, ch)

    boxes = [sp_flatten(_v) for _v in boxes]
    classes_conf = [sp_flatten(_v) for _v in classes_conf]
    scores = [sp_flatten(_v) for _v in scores]

    boxes = np.concatenate(boxes)
    classes_conf = np.concatenate(classes_conf)
    scores = np.concatenate(scores)

    # filter according to threshold
    boxes, classes, scores = filter_boxes(boxes, scores, classes_conf)

    # nms
    nboxes, nclasses, nscores = [], [], []

    for c in set(classes):
        inds = np.where(classes == c)
        b = boxes[inds]
        c = classes[inds]
        s = scores[inds]
        keep = nms_boxes(b, s)

        if len(keep) != 0:
            nboxes.append(b[keep])
            nclasses.append(c[keep])
            nscores.append(s[keep])

    if not nclasses and not nscores:
        return None, None, None

    boxes = np.concatenate(nboxes)
    classes = np.concatenate(nclasses)
    scores = np.concatenate(nscores)

    return boxes, classes, scores


def draw(image, boxes, scores, classes):
    for box, score, cl in zip(boxes, scores, classes):
        top, left, right, bottom = [int(_b) for _b in box]
        print("%s @ (%d %d %d %d) %.3f" % (CLASSES[cl], top, left, right, bottom, score))
        cv2.rectangle(image, (top, left), (right, bottom), (255, 0, 0), 2)
        cv2.putText(image, '{0} {1:.2f}'.format(CLASSES[cl], score),
                    (top, left - 6), cv2.FONT_HERSHEY_SIMPLEX, 0.6, (0, 0, 255), 2)

def setup_model(args):
    model_path = args.model_path
    if model_path.endswith('.pt') or model_path.endswith('.torchscript'):
        platform = 'pytorch'
        from py_utils.pytorch_executor import Torch_model_container
        model = Torch_model_container(args.model_path)
    elif model_path.endswith('.rknn'):
        platform = 'rknn'
        from py_utils.rknn_executor import RKNN_model_container
        model = RKNN_model_container(args.model_path, args.target, args.device_id)
    elif model_path.endswith('onnx'):
        platform = 'onnx'
        from py_utils.onnx_executor import ONNX_model_container
        model = ONNX_model_container(args.model_path)
    else:
        assert False, "{} is not rknn/pytorch/onnx model".format(model_path)
    print('Model-{} is {} model, starting val'.format(model_path, platform))
    return model, platform

def img_check(path):
    img_type = ['.jpg', '.jpeg', '.png', '.bmp']
    for _type in img_type:
        if path.endswith(_type) or path.endswith(_type.upper()):
            return True
    return False

class Detect:
    def __init__(self) -> None:
        # 初始化摄像头
        self.cap = cv2.VideoCapture(0)

        parser = argparse.ArgumentParser(description='Process some integers.')
        # basic params
        parser.add_argument('--model_path', type=str, default= "/home/iflytek/ucar_ws/src/ucar_nav/scripts/scripts/1.onnx",  help='model path, could be .pt or .rknn file')
        parser.add_argument('--target', type=str, default='rk3588', help='target RKNPU platform')
        parser.add_argument('--device_id', type=str, default=None, help='device id')

        parser.add_argument('--img_show', action='store_true', default=False, help='draw the result and show')
        parser.add_argument('--img_save', action='store_true', default=False, help='save the result')

        # data params
        parser.add_argument('--anno_json', type=str, default='../../../datasets/COCO/annotations/instances_val2017.json', help='coco annotation path')
        # coco val folder: '../../../datasets/COCO//val2017'
        parser.add_argument('--img_folder', type=str, default='../model', help='img folder path')
        parser.add_argument('--coco_map_test', action='store_true', help='enable coco map test')
        parser.add_argument('--anchors', type=str, default='/home/iflytek/ucar_ws/src/ucar_nav/scripts/scripts/anchors_yolov5.txt', help='target to anchor file, only yolov5, yolov7 need this param')

        args = parser.parse_args()

        # load anchor
        with open(args.anchors, 'r') as f:
            values = [float(_v) for _v in f.readlines()]
            self.anchors = np.array(values).reshape(3,-1,2).tolist()
        print("use anchors from '{}', which is {}".format(args.anchors, self.anchors))

        # init model
        self.model, self.platform = setup_model(args)

        file_list = sorted(os.listdir(args.img_folder))
        img_list = []
        for path in file_list:
            if img_check(path):
                img_list.append(path)
        self.co_helper = COCO_test_helper(enable_letter_box=True)

        # run test
        for i in range(len(img_list)):
            print('infer {}/{}'.format(i+1, len(img_list)), end='\r')

            img_name = img_list[i]
            img_path = os.path.join(args.img_folder, img_name)
            if not os.path.exists(img_path):
                print("{} is not found", img_name)
                continue


    def get_data(self):
        ret, img_src = self.cap.read()
        # 在这里开始魔改
        if not ret:
            return None
        # Due to rga init with (0,0,0), we using pad_color (0,0,0) instead of (114, 114, 114)
        pad_color = (0,0,0)
        img = self.co_helper.letter_box(im= img_src.copy(), new_shape=(IMG_SIZE[1], IMG_SIZE[0]), pad_color=(0,0,0))
        img = cv2.cvtColor(img, cv2.COLOR_BGR2RGB)
        # preprocee if not rknn model
        if self.platform in ['pytorch', 'onnx']:
            input_data = img.transpose((2,0,1))
            input_data = input_data.reshape(1,*input_data.shape).astype(np.float32)
            input_data = input_data/255.
        else:
            input_data = img

        outputs = self.model.run([input_data])
        boxes, classes, scores = post_process(outputs, self.anchors)
        print(boxes,classes,scores)
        return boxes, classes, scores
    def free_cam(self):
        self.cap.release()
        return 1
if __name__ == "__main__":
    det = Detect()
    while True:
        det.get_data()
之后在终端输入
sudo modprobe rknpu更改默认的模型目录,直接运行即可。
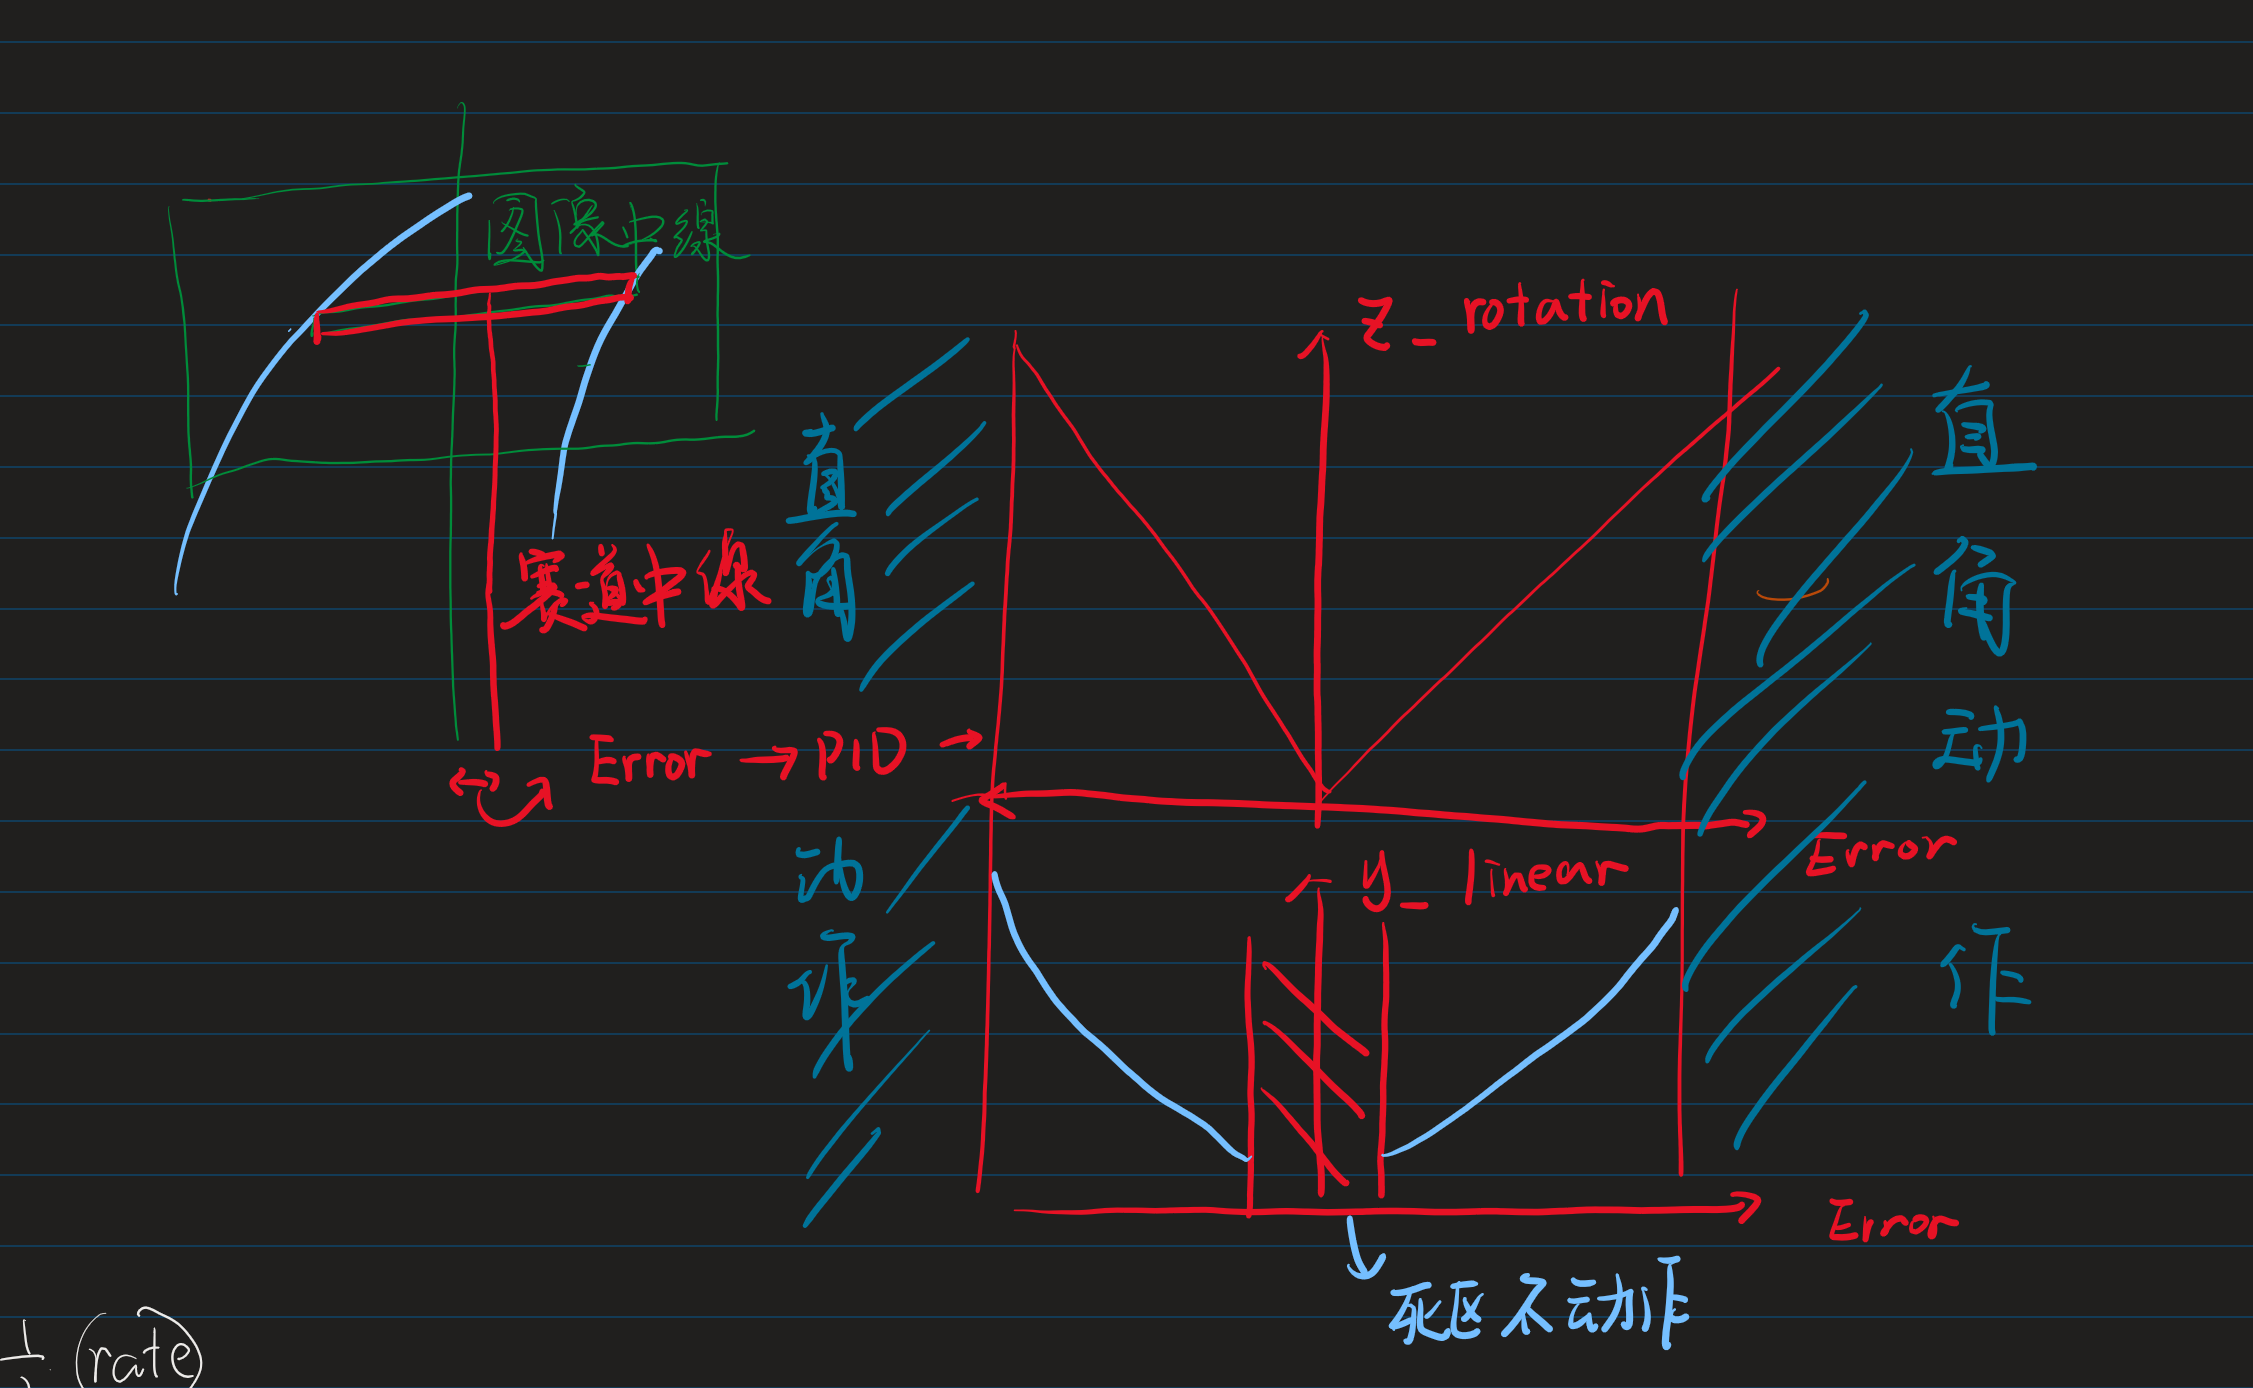
第三部分:巡线方案详解
图像预处理与边缘检测
太晚了,大概写一下思路吧,基本丢给gpt就能写出来。
因为我们的赛道是蓝色的,为了消除别的颜色的噪声,(也是算力不行上hsv估计完蛋)我们只保留R(红色)通道的内容。
之后对灰度图坐均值模糊,来消除高频噪声。
然后使用自适应阈值二值化,来得到边缘的结果。
之后使用一小条“扫描条”,来获取图像中某一个范围内的赛道边界像素位置。
漂移是怎么搞的
通常我们把往前的速度(x_linear)给定之后用赛道左右边界之中值与中心像素点差值作为误差给Pid计算后给到旋转速度。但是这个车不可避免因为摄像头的原因控制并不是实时的,故压线乃常态。
于是我们给定一个死去与,然后把pid回馈值与一个非线性函数绑定后给到y方向的速度,从此做到漂移。
值得注意的是这个东西在比赛中没啥用。
与此同时我们搞直角。
直角怎么转
其实没有用很特别的方法坐直角的元素判断,直接使用pid回馈值,如果大于某一个阈值就认为是在直角。
在认为是直角后再根据需要转向的方向来给到底盘一个连续的动作,即:
向前一段,原地转弯,然后继续交给pid。
这个其实也不难写,就是调试麻烦死了。
大概是这样:
怎么停车
非常粗暴:没有检测到赛道左右两边的任何一条线,认为停止。
为了不被误识别,所以加上了时间限幅,即在某一时间前不对停车判定做出任何相应